From On‑Prem to AVS: Overcoming SQL Server FCI Shared Storage Limitations

Overview:
Recently, I came across a requirement, where customer has multiple on-permise SQL Server FCI active-passive traditional clusters, which are virtualized over VMware vSphere on the primary side.
Good old days!
In-order to build an on-premise SQL FCI disaster recovery, in the old days, we use to replicate the primary LUNs from primary site to DR site using storage array block-level replication appliances, such as EMC Recover Point.
And in case of a disaster recovery or drill, we use to break the sync, and attach the LUNs from the DR SAN to DR hypervisor or servers, e.g. SQL / Hyper-V or VMware, and add them inside the VM as RDM / pass-through, and VM sees the data and can mount the databases.
Cloud migration
When it comes to migration or replication, all migration and replication tools, don’t support RDM / pass-through disk, which means that, OS and data disks will be included, however, RDMs will be skipped.
Replace of shared storage within Azure VMware Solution (AVS) construct
When we will create the third-node, lets say in AVS, then we would also need a massive amount of storage, and primarily in AVS, storage is based on the cluster node size, which comprises the vSAN total capacity, and once way to increase that by increasing the number of cluster nodes, which could be costly. Therefore, an ideal way would be to employ Azure Elastic SAN or Azure NetApp Files datastores. Where, Azure Elastic SAN gives additional feature of providing iSACI based access, to block level storage, so inside you have directly LUN assigned and can also setup FCI cluster, but in case of NetApp, which is primarily a NFS storage, you can only have larger VMKD files for VMs. Both are enterprise solution ana easily can be setup with AVS.
Migration to Azure VMware Solution
I was primarily searching for a sicario, where DR instance, we need to migrate to Azure VMware Solution, but due to missing underlying replication of databases (storage), it was bit tricky to find a solution, which would replicate the data, if we remove the storage replication system, e.g. Recover Point.
Also, AVS doesn’t support RDMs, so new solution which we deploy on AVS, should be compatible and design should not have any RDM concept.
Lab & Solution:
During searching for a solution, I came across a scenario where, on top of existing FCI cluster, we can enable Availability Group (AG), which would allow to keep the FCI running as-it-is on primary site, and allow replication of data (log-shipping) from primary site to DR site using Availability Group feature of SQL (Always-On).
Since, I had never done this in past, so I thought to spend some time and build this solution in the lab, and here you go…
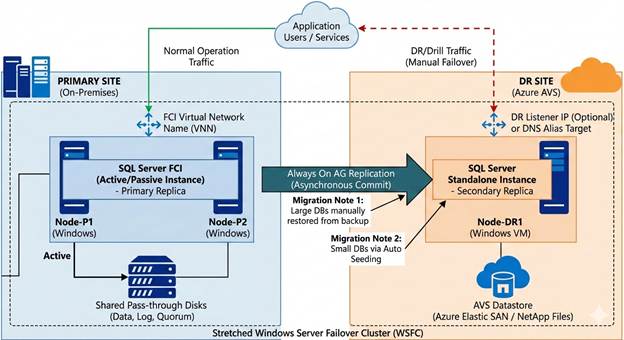
High-level Architecture:
The goal was straightforward: replicate databases from the FCI to the DR node using asynchronous replication without disrupting production.
FCI Side (Primary): The two-node cluster provides local high availability with automatic failover. An Azure Internal Load Balancer with health probe on port 59999 manages the cluster IP resource.
DR Side (Secondary): A standalone SQL Server instance joins the same Windows Failover Cluster but doesn’t participate in the FCI. Instead, it acts as an asynchronous AG replica.
Replication Flow: Databases in the FCI replicate to the DR node via database mirroring endpoints (port 5022). The FCI replica uses synchronous commit for local HA, while the DR replica uses asynchronous commit to avoid impacting production latency.
In this scenario, consider, you already have a running two-node FCI cluster in production environment.

My lab machines: Here’s what we were working with:
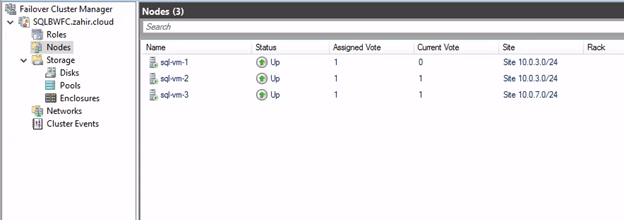
– FCI Nodes: sql-vm-1 and sql-vm-2 (10.0.3.0/24 subnet)
– FCI Instance: MYSQL01 (default instance)
Adding a DR Site SQL Server:
This additional DR site SQL Server properties:
- Domain joined : Yes
- Joined to existing SQL cluster: Yes
- Joind to existing SQL cluster: No (Which means you add the machin to the based Windows Failover Cluter, but you don’t install the SQL cluster node on this machine.
- SQL Installation: We will install standalone SQL Server on this machine
- SQL Instnace: If your existing SQL server instance is using default instance, then, you must need to create named instance.
– DR Node: sql-vm-3 (10.0.7.0/24 subnet)
– DR Instance: sql-vm-3\mysqldr (named instance)
– Storage: FCI uses shared K: and L: drives; DR uses local P: and O: drives
Implementation Steps
- I created a two-node FCI failover cluster in Azure IaaS VMs then, created a base failover cluster.
- You have to also add Azure-load balancer, as floating IP address is not allowed, and ensure that, you don’t keep the same port as health-probe as SQL 1433, use any random port like 50009.
- Install SQL active-passive cluster with shared disk using disk managed disk in Azure.
- Then I created a third VM in Azure, added to the AD domain. Also added node to existing failover cluster, and then installed standalone SQL server.
- After this real-game starts using SQL AG setup:
Note: Use different drive letters as compare to FCI, otherwise, setup will give errors, and use same service accounts for standalone SQL as well.
Install SQL Server as a standalone instance (not FCI) on sql-vm-3. Use a named instance like `mysqldr` to differentiate it from the FCI. During installation, configure:
– Service account: Use the same domain account as the FCI (e.g., ZAHIR\sql)
– Data directories: Point to local disks (P:\Databases, O:\Log-Files)
Lesson learned: Make sure these directories exist before attempting database restores later!
- Configure Azure Load Balancer (If Not Already Done)
The cluster IP resource needs the correct probe port configured. If your health probe uses port 59999, update the cluster resource:
| “`powershell Get-ClusterResource “SQL IP Address (MYSQL01)” | Set-ClusterParameter -Name ProbePort -Value 59999 Stop-ClusterResource “SQL IP Address (MYSQL01)” Start-ClusterResource “SQL IP Address (MYSQL01)” “` |
This was critical—without matching the probe port, the cluster IP wouldn’t come online.
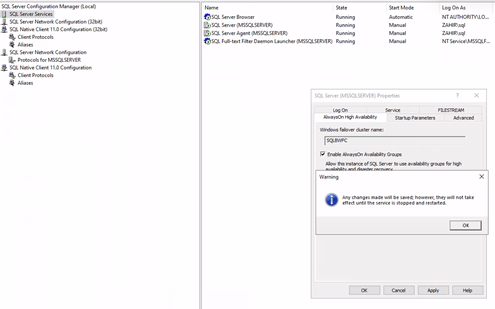
- Enabling Always on Availability Feature on FCI and Standalone SQL Servers
This you can do from SQL Configuration Manager, go to the SQL Services and take a properties of the SQL database engine service and go to the “AlwaysOn High Availability” tab and “Enable AlwaysOn Availability Group” feature and restart service.
- Create Database Mirroring Endpoints
On the primary SQL FCI primary node run the below commands:
| “`sql CREATE ENDPOINT Hadr_endpoint STATE = STARTED AS TCP (LISTENER_PORT = 5022, LISTENER_IP = ALL) FOR DATABASE_MIRRORING ( AUTHENTICATION = WINDOWS NEGOTIATE, ENCRYPTION = REQUIRED ALGORITHM AES, ROLE = ALL ); GRANT CONNECT ON ENDPOINT::Hadr_endpoint TO [ZAHIR\sql]; “` On the DR instance: “`sql CREATE ENDPOINT Hadr_endpoint STATE = STARTED AS TCP (LISTENER_PORT = 5022, LISTENER_IP = ALL) FOR DATABASE_MIRRORING ( AUTHENTICATION = WINDOWS NEGOTIATE, ENCRYPTION = REQUIRED ALGORITHM AES, ROLE = ALL ); GRANT CONNECT ON ENDPOINT::Hadr_endpoint TO [ZAHIR\sql]; “` |
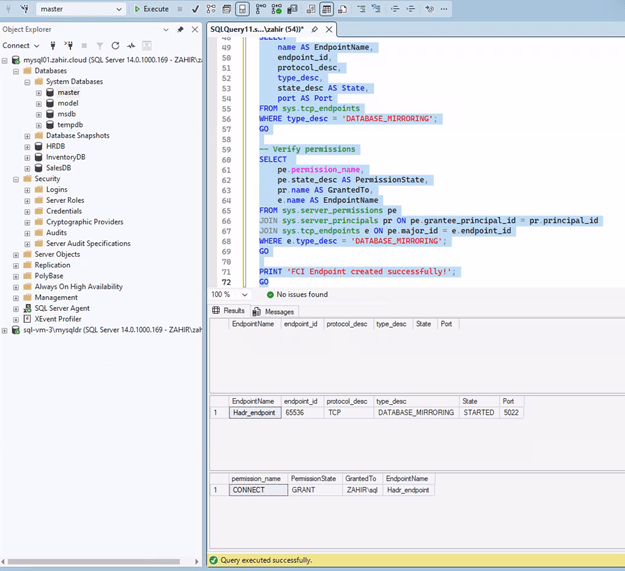
Note: Restart the SQL Server service on the FCI after creating the endpoint to ensure it starts listening.
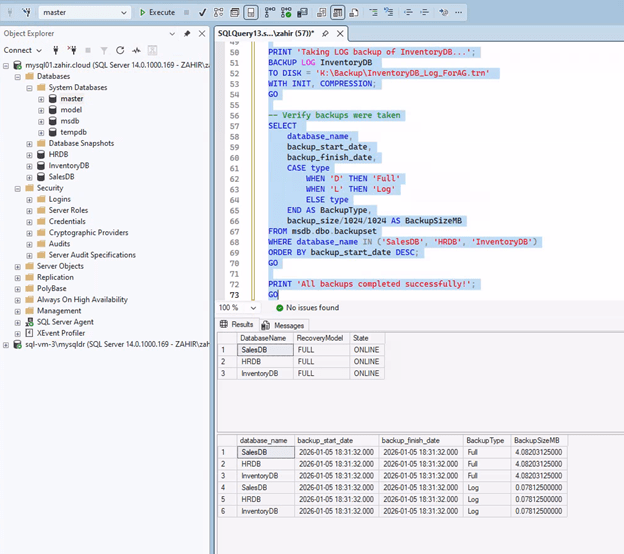
- Prepare Databases
Set databases to FULL recovery model and take initial backups:
| “`sql — Run on FCI Primary for each database ALTER DATABASE [YourDatabaseName] SET RECOVERY FULL; BACKUP DATABASE [YourDatabaseName] TO DISK = ‘K:\Backup\YourDatabaseName_ForAG.bak’ WITH INIT, COMPRESSION; BACKUP LOG [YourDatabaseName] TO DISK = ‘K:\Backup\YourDatabaseName_ForAG.trn’ WITH INIT, COMPRESSION; “` |
For multiple databases, use a cursor or repeat for each database you want to include in the AG.
Create the Availability Group
On the FCI Primary run the below commands:
| “`sql CREATE AVAILABILITY GROUP [AG_FCI_to_DR] WITH (AUTOMATED_BACKUP_PREFERENCE = PRIMARY) FOR DATABASE [Database1], [Database2], [Database3] — List all databases REPLICA ON N’MYSQL01′ WITH ( ENDPOINT_URL = N’TCP://mysql01.zahir.cloud:5022′, FAILOVER_MODE = MANUAL, AVAILABILITY_MODE = SYNCHRONOUS_COMMIT, BACKUP_PRIORITY = 50, SECONDARY_ROLE(ALLOW_CONNECTIONS = NO), SEEDING_MODE = AUTOMATIC ), N’sql-vm-3\mysqldr’ WITH ( ENDPOINT_URL = N’TCP://sql-vm-3.zahir.cloud:5022′, FAILOVER_MODE = MANUAL, AVAILABILITY_MODE = ASYNCHRONOUS_COMMIT, BACKUP_PRIORITY = 25, SECONDARY_ROLE(ALLOW_CONNECTIONS = READ_ONLY), SEEDING_MODE = AUTOMATIC ); “` |
Important: FCI replicas must use `FAILOVER_MODE = MANUAL`—automatic failover isn’t supported for FCI in AG configurations.
Join the DR Replica
On your SQL DR machine within SSMS, run below commands:
On sql-vm-3\mysqldr:
| “`sql ALTER AVAILABILITY GROUP [AG_FCI_to_DR] JOIN; — Ensure service account has permissions ALTER SERVER ROLE sysadmin ADD MEMBER [ZAHIR\sql]; “` |
Manual Database Seeding (When Automatic Fails)
In our case, automatic seeding didn’t work reliably. The solution was manual restore. Copy backups to the DR server (we used P:\Backup\Backup), then:
*** This is to be noted here, that during my testing, automatic seeding didn’t work, and until I restored all the databases from backup, and then seeding and synchronization started normally.
| “`sql — Run on DR for each database RESTORE DATABASE [Database1] FROM DISK = ‘P:\Backup\Backup\Database1_ForAG.bak’ WITH NORECOVERY, MOVE ‘Database1_Data’ TO ‘P:\Databases\Database1.mdf’, MOVE ‘Database1_Log’ TO ‘O:\Log-Files\Database1_log.ldf’, REPLACE; RESTORE LOG [Database1] FROM DISK = ‘P:\Backup\Backup\Database1_ForAG.trn’ WITH NORECOVERY; ALTER DATABASE [Database1] SET HADR AVAILABILITY GROUP = [AG_FCI_to_DR]; “` |
Key lesson: The restore paths (P:\Databases, O:\Log-Files) must exist before running RESTORE commands. Obvious in hindsight, but it caused initial failures.
Repeat for each database. Within seconds of joining, databases should show “SYNCHRONIZING” and quickly transition to “SYNCHRONIZED.”
Enable Readable Secondary
During DR or testing, you can enable a particular database read-only, to see that latest changes are being replicated.
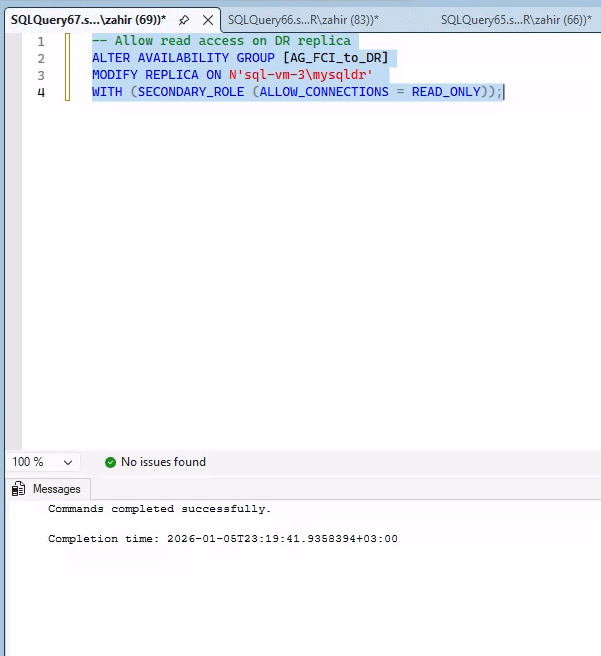
To query the DR replica, enable read access:
| “`sql — Run on Primary ALTER AVAILABILITY GROUP [AG_FCI_to_DR] MODIFY REPLICA ON N’sql-vm-3\mysqldr’ WITH (SECONDARY_ROLE (ALLOW_CONNECTIONS = READ_ONLY)); “` |
Testing Replication
In this section, we will have couple of test raws to the existing database on primary site, and later will check this on the DR side.
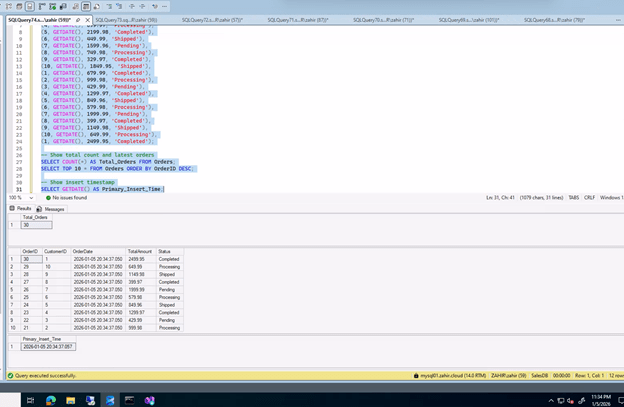
On the Primary:
| “`sql USE SalesDB; INSERT INTO Orders (CustomerID, OrderDate, TotalAmount, Status) VALUES (2, GETDATE(), 1299.95, ‘Completed’), (3, GETDATE(), 549.99, ‘Shipped’), (4, GETDATE(), 899.97, ‘Processing’), (5, GETDATE(), 2199.98, ‘Completed’); SELECT COUNT(*) AS Total_Orders FROM Orders; SELECT GETDATE() AS Primary_Insert_Time; “` |
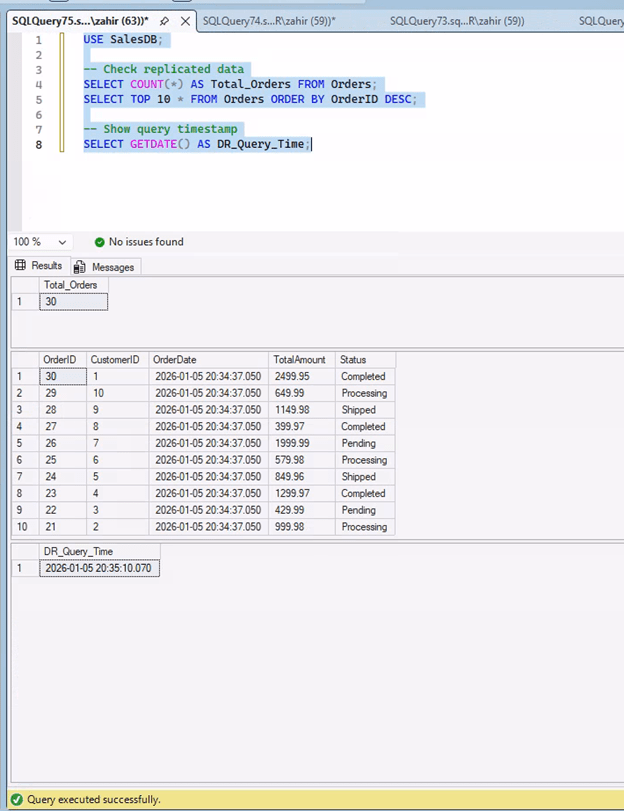
Checking from DR SQL – make sure that you connect SSMS using advance option and recovery mode:
Connect to sql-vm-3\mysqldr with `ApplicationIntent=ReadOnly` (in SSMS: Options → Additional Connection Parameters → add `ApplicationIntent=ReadOnly`):
| “`sql USE SalesDB; SELECT COUNT(*) AS Total_Orders FROM Orders; SELECT TOP 5 * FROM Orders ORDER BY OrderID DESC; SELECT GETDATE() AS DR_Query_Time; “` |
In our testing, replication was nearly instantaneous—new rows appeared on the DR within 1-2 seconds.
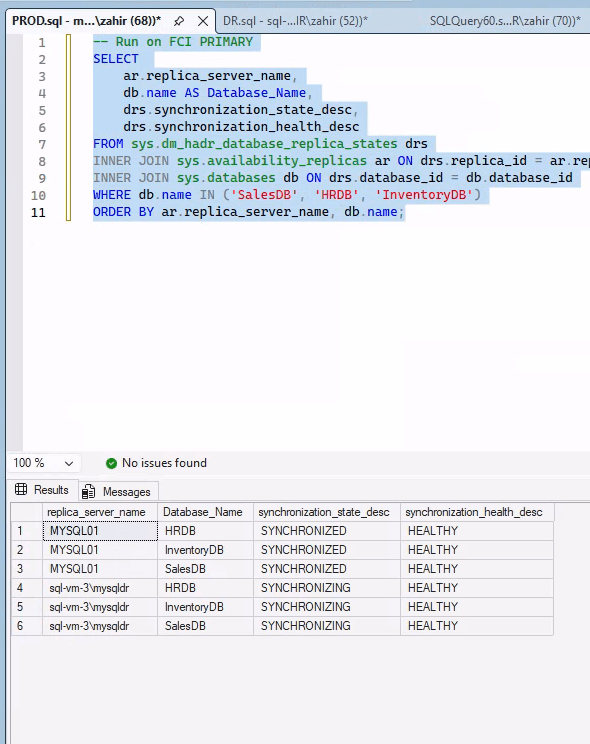
Commands to Monitor Synchronization:
| “`sql — Synchronization status SELECT ar.replica_server_name, db.name AS Database_Name, drs.synchronization_state_desc, drs.synchronization_health_desc FROM sys.dm_hadr_database_replica_states drs INNER JOIN sys.availability_replicas ar ON drs.replica_id = ar.replica_id INNER JOIN sys.databases db ON drs.database_id = db.database_id ORDER BY ar.replica_server_name, db.name; “` |
Healthy replication shows “SYNCHRONIZED” state and “HEALTHY” status for all databases.
Scaling to All Databases
To apply this to all user databases automatically, use a cursor:
| “`sql — Generate backup commands for all user databases DECLARE @dbname NVARCHAR(128); DECLARE db_cursor CURSOR FOR SELECT name FROM sys.databases WHERE database_id > 4 AND state_desc = ‘ONLINE’; OPEN db_cursor; FETCH NEXT FROM db_cursor INTO @dbname; WHILE @@FETCH_STATUS = 0 BEGIN EXEC(‘ALTER DATABASE [‘ + @dbname + ‘] SET RECOVERY FULL’); EXEC(‘BACKUP DATABASE [‘ + @dbname + ‘] TO DISK = ”K:\Backup\’ + @dbname + ‘_ForAG.bak” WITH INIT, COMPRESSION’); EXEC(‘BACKUP LOG [‘ + @dbname + ‘] TO DISK = ”K:\Backup\’ + @dbname + ‘_ForAG.trn” WITH INIT, COMPRESSION’); FETCH NEXT FROM db_cursor INTO @dbname; END; CLOSE db_cursor; DEALLOCATE db_cursor; “` |
Troubleshooting Tips
“SYNCHRONIZING” never completes: Check that log_send_queue_size and redo_queue_size are zero. If they are, it’s just a UI caching issue—refresh Object Explorer.
Can’t query DR databases: Ensure you’re connected with `ApplicationIntent=ReadOnly`. The error “database is in an availability group” means you need this connection parameter.
Automatic seeding stuck: Fall back to manual restore. Sometimes automatic seeding hangs on smaller databases. Manual restore is reliable and fast.
Endpoint not listening: Restart SQL Server after creating the endpoint, especially on FCI nodes.
Conclusion
Setting up AG-based DR replication from an existing FCI took some trial and error, but the result is solid. We now have:
– Local HA via the two-node FCI with synchronous replication
– DR protection via asynchronous replication to a remote site
– Readable secondary for offloading reporting queries
– No changes to production connection strings
Same scenario can be implemented on Azure IaaS VM or any other platform such as Azure VMware Solution or NC2.
The key takeaways: plan your storage paths carefully, don’t trust automatic seeding blindly, and remember that FCI replicas need manual failover mode. With these lessons learned, the setup is straightforward and provides robust disaster recovery without disrupting the existing production environment.
Total setup time after figuring out the quirks? About an hour. Well worth it for the peace of mind.

Leave a comment