Configuring Exchange DAG replication network can be tricky when it comes to allowing primary Exchange DAG replication network to chat with secondary / DR Exchange DAG replication network. If you try to use default gateway on the replication network either on primary or secondary site you might find that Exchange DAG replication at primary site goes bad and sometime I witnessed that Exchange DAG mailbox member servers loose the access to File Share Witness. Or possibly you might find your replication network would go down from the failover clustering prospective.
Having two default gateway on any server would make things go wrong and it is not recommended. Okay so you would be wondering what about adding Static Route for the replication network?
Well upon checking for the above explained issue with adding default gateway, I found that static route would not be able to fix your problem and even if they work for you configuring them with persistence switch, sometime it is also seen that they get disappeared.
Adding IP Routes with NETSH:
So what is the solution? The best solution for allowing Exchange DAG replication network to talk to remote DAG member is to use the NETSH IP routes for adding replication interface. In the below steps we will see steps you need to do on both side for adding NETSH routes for replication networks.
Let’s assume that we have following replication networks configured on the Exchange Servers on the both sides:
| Primary Exchange DAG Mailbox Server | |||
| Mailbox Server Name | Interface Name (NIC) | Replication Network / IP Address | Default Gateway for replication network |
| MBX1 | Replication | 192.168.1.100 | 192.168.1.1 |
| MBX1 | Replication | 192.168.1.101 | 192.168.1.1 |
| Secondary / DR Exchange DAG Mailbox Server | |||
| Mailbox Server Name | Interface Name (NIC) | Replication Network / IP Address | Default Gateway for replication network |
| MBXDR1 | Replication | 192.168.2.100 | 192.168.2.1 |
| MBXDR2 | Replication | 192.168.2.101 | 192.168.2.1 |
Now follow the below steps to configure the NETSH routes first on the primary DAG members:
- Open Command Prompt on the server with Run As Administrator rights.
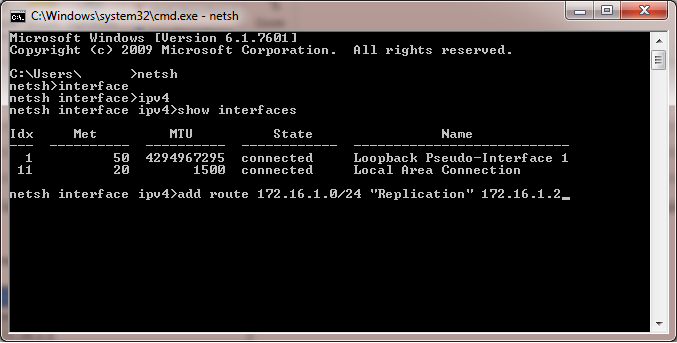
- Type “netsh” and hit enter to go into netsh command shell.
- Then type “interface” and hit enter to go into interfaces section.
- Type “ipv4” and press enter to go inside IPv4 interfaces.
- If you don’t know the name of your interface you can also see all the IPV4 interfaces, by executing “show interfaces” command.
- Now we will add route by executing the command “add route 192.168.2.0/24 “Replication” 192.168.1.1” while remain in the NetSH command shell.
- Perform the same above steps on the second primary DAG Exchange Mailbox Server.
- Now we have to perform the same steps outlined above on secondary Exchange DAG Mailbox Servers for reverse routes.
Perform the reserve route adding process explained in the above image on the both secondary Exchange DAG Mailbox Servers.Verifying NETSH Interface Routes:
After adding the routes we can also verify for the successful addition of the routes for the replication network, by showing IP routes for interfaces by executing the below command: - We can also verify the successful addition of NETsh routes by checking the registry (HKEY_LOCAL_MACHINE\SYSTEM\CurrentControlSet\Services\Tcpip\Parameters\PersistentRoutes) for the available routes.
I hope it would be helpful to fix Exchange DAG replication network routing issues.
Cheers!

Leave a comment